PURCHASE ORDER OVERVIEW
This article explains how to review, update, and submit Purchase Orders (POs) in Tradeshift. Focus on reviewing transport details and correcting any errors before submission.
Note:
If it is your first time opening the apps, open them through here:
HOW TO ACCESS A PURCHASE ORDER
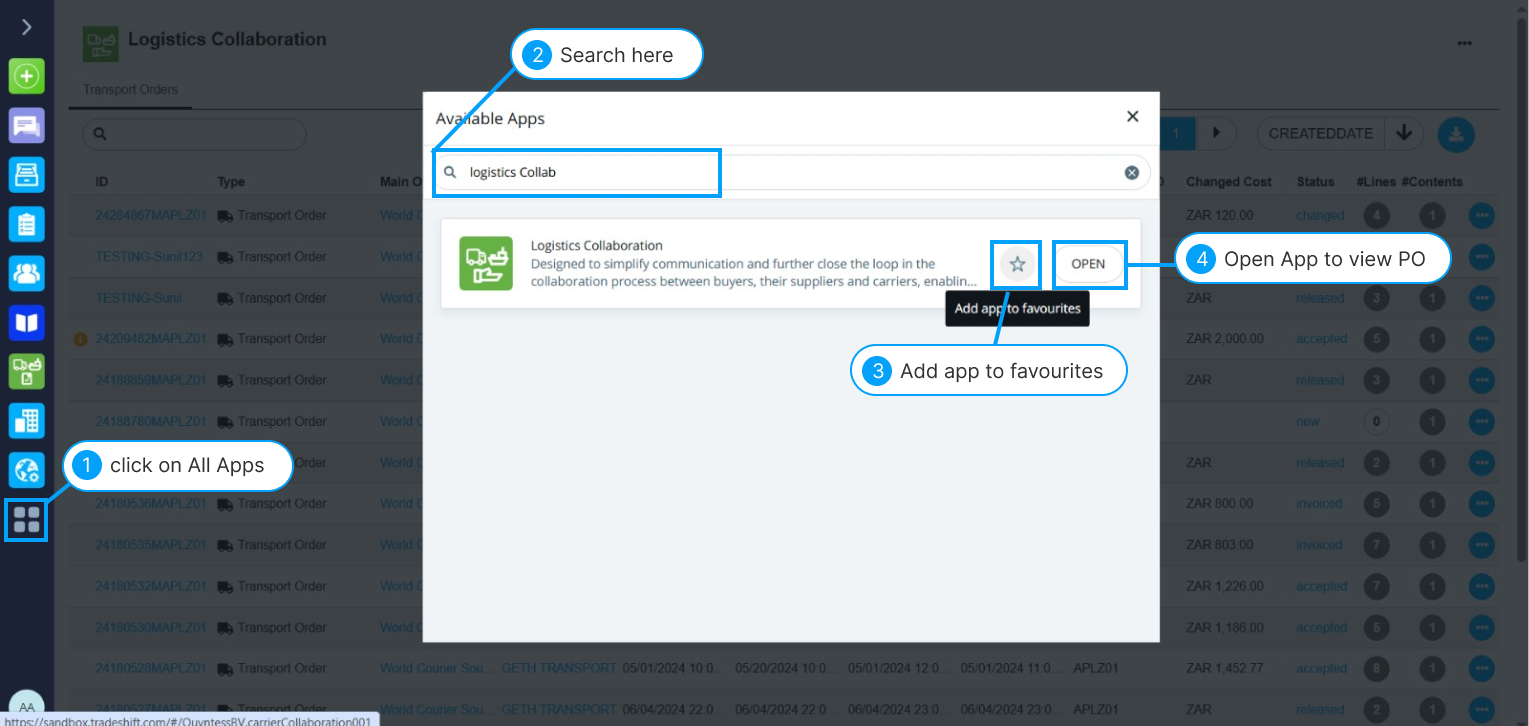
- Go to All Apps from the menu
- Search for Logistics Collaboration App
- Click the ⭐ icon to add it to your favorites for quick access
- Open the app to view all available Purchase Orders
- Search for the purchase order you wish to edit.
- Tip: Enter the PO number in the search bar to locate it quickly
- Note: If the PO isn’t available, contact World Courier representative so they can upload it
- The PO status will appear as “Released”. If the status is different, and you cannot edit your POs, please inform Tradeshift support
STEP-BY-STEP PROCESS FOR REVIEWING AND SUBMITTING PO
Note: Only charges included in the rate card will be able to be added
Step 1: Review Job Details
- Confirm all basic details:
- Pickup location
- Delivery location
- Scheduled times
- Verify the distance displayed is accurate. Example: If the PO lists 2000 miles when the actual distance is far less, this needs correction, which can be done in Cost Components.
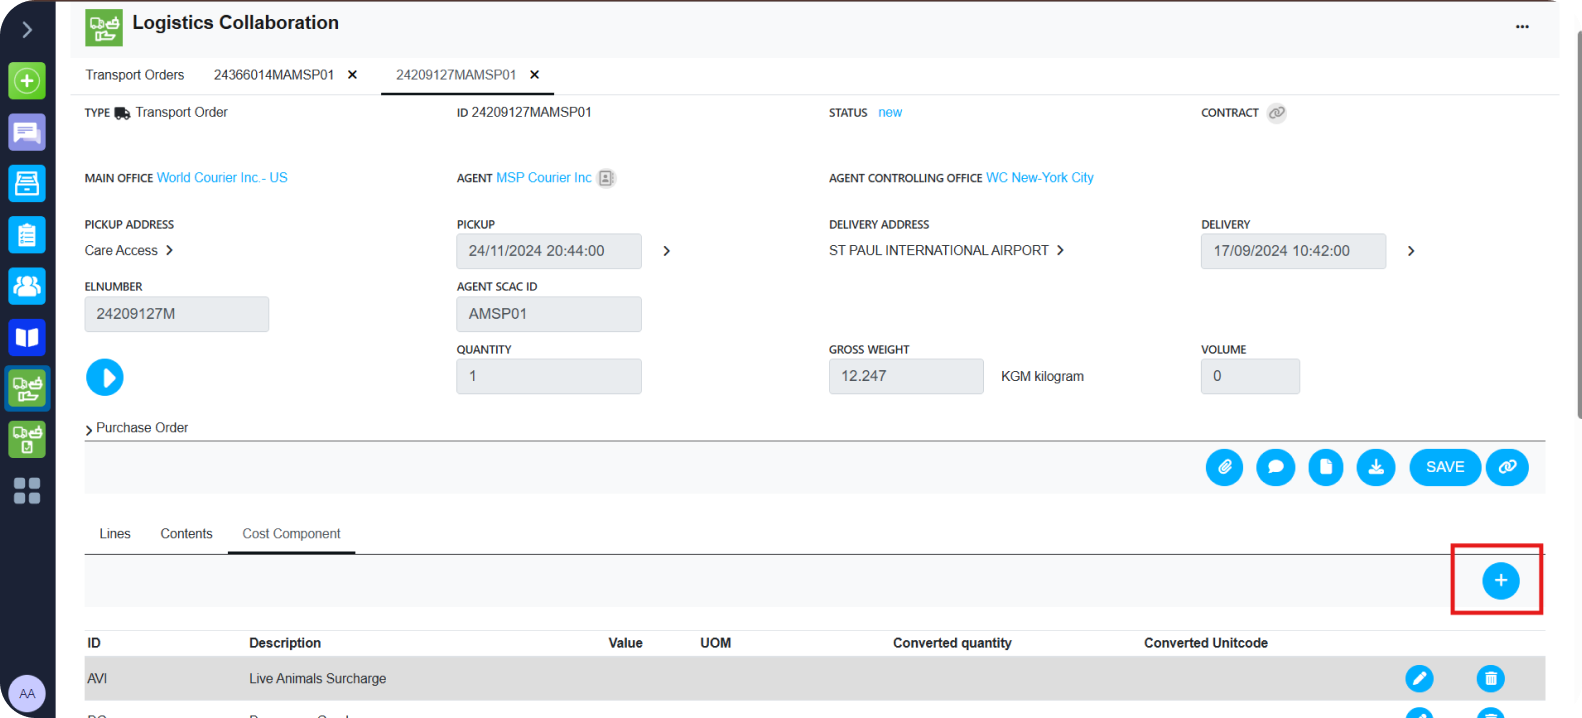
Step 2: Check Cost Components and Lines
- Before submitting the PO, carefully review the Cost Components and Lines tabs, which represent the charges for the job.
- What to Review:
- Distance:
- Correct any wrong distances directly within the PO.
- Only adjust if you're sure it's incorrect
- Charges Displayed:
- Ensure only valid charges appear:
- Collection charges
- Fuel surcharge etc
- Optional/Additional Charges:
- Check if more charges should apply such as :
- After-hours handling
- Wait time
- Special services (e.g., parking fees)
- If applicable, these must be added manually (explained in the next step).
Step 3: Adding Missing Charges with “Add Cost Segment”
- If charges are missing:
- Click on ‘+’ inside the PO for additional charges.
- In the pop-up:
- Select the correct Type of Charge (must align with the Rate Card or approved list).
- Enter the Amount/Value.
- Optionally, add a description to explain the charge.
- Click Apply to add the charge to the PO.
- Review all added charges before submission.
Tips:
- Add a comment explaining the reason (e.g., “Dry ice was required”) using
 comment icon
- Upload any supporting documents using the
 paperclip icon
How to Add Charges
Some charges must first be added under Cost Components tab, before you can add their specific details in Lines, to ensure all details can be auto-calculated. Below, you will a summary on how to add every type of charge.
How to add charges Summary Table:

Step 4: Final Review Before Submission
- Ensure:
- Distance is correct.
- All required charges are listed.
- No incorrect or duplicate charges are present.
- Once verified, click Submit.
- PO status will change to “Confirmed.”
- If you have not added any additional charges, you can go ahead and invoice by clicking “invoice”. If you have added charges, please wait for World Courier to review and approve the charges.
- You can find the next steps here: Flip a Purchase Order into an Invoice
Note:
If you missed a charge and have already invoiced the Purchase Order, please add it to the next Purchase Order you invoice and add a comment, referencing the charge and which PO it relates to